This usage guide covers the email options available with your WPMU DEV hosting account. If you haven’t set up a WPMU DEV hosting account yet, visit the hosting page where you can explore the features and see pricing packages.
The types of email available with a WPMU DEV hosting account are:
- Transactional Email – These are emails WordPress sends regarding the administration and maintenance of your WordPress site.
- POP Email Accounts – Members whose sites we host can create up to 10 free email accounts for each site to send and receive domain emails using any email client or cloud-based email service.
- Email Forwarding – Forwarding is a simple way to create an email address that includes your domain name, without having to incur additional costs.
- SMTP – Use any email service with valid SMTP credentials and our Branda plugin to send WordPress transactional emails from another email address that you own.
Each form of email has its own strengths and limitations (see below). Use this guide to determine which works best for your site or network.
Not sure which email options to use?
Check out our comprehensive How To Set Up Free Email Accounts With WPMU DEV’s Managed Hosting for WordPress walkthrough and tutorial on our blog to help you make the best choices for your project.
10.1 Email Policies and Limitations
The email options described above are available on all WPMU DEV hosted sites at no additional cost, because we recognize that email is fundamental to growing a site. Yet, we still need to manage the resources this service consumes, so some limitations are appropriate.
- Transactional Email Policies
- Transactional Email Limits
- Email Account Limitations
- Email Forwarding Limitations
- POP and SMTP Only
Transactional Email Policies
These are emails WordPress sends regarding the administration and maintenance of your WordPress site. Examples include WordPress updates, new user registrations and user comments.
In order to protect our members’ domain reputations and to keep their emails from winding up in spam inboxes, the From address on these transactional emails is [email protected]. All WPMU DEV sites are preconfigured to handle transactional emails in this way, and no configuration is required.
We do not allow sending non-transactional emails from [email protected]. This restriction applies to email subscriptions, newsletters, marketing, or mass email. These types of emails should be sent from an email address you own.
If you wish to change the From address on noreply emails to an address you own, see the Using SMTP To Send Emails chapter below.
Transactional Email Limits
The number of transactional emails sent per day and month for each site is also limited, as shown below. These limits only apply if you are using our default [email protected] address. They do not apply if you’re using an email address you own through a third-party mail service.
These sending limits are continuously monitored and, if your site exceeds these limits, we will notify you and temporarily block email sending until the daily or monthly average falls below the limit allowed on your plan.
Hosting Plan
Quantum
Bronze
Silver
Gold
Platinum
Uranium
Titanium
Palladium
30-Day Limit (last 30 days)
1,500
3,000
6,000
12,000
24,000
48,000
48,000
48,000
24-Hour Limit (last 24 hours)
75
150
300
600
1,200
2,400
2,400
2,400
Note that daily email limits are calculated based on the last 24-hour period, and the cumulative 30-day total cannot exceed the 30-day limit. For example, if you’re on the Bronze hosting plan, which has a limit of 150 emails, and you send 50 emails at 5am, another 50 at 10am, and another 50 at 3pm, you’ll have hit the 24-hour limit allowed by that plan. You’d have to wait until 5am the next day to be able to send another 50 emails, at which time you’d again hit the limit for the last 24 hours.
Still following along on our example of Bronze hosting, if you consistently send 150 emails for every 24-hour period, you’d hit the 30-day limit of 3000 within 20 days. You’d then need to wait a full 24 hours before being able to send a single email.
This explains why you might not be able to send emails, although the Site Email Stats area shows that you sent less than 150 emails (in our example, it is 50 emails) for that specific day.
If your site needs to regularly send more emails than our quota allows, please upgrade your plan or configure WordPress to use SMTP or another transactional email service like MailChannels.
You can view the number of emails your site has sent during the past 30 days in the Site Email Stats area of the Email Dashboard.

IMPORTANT
Note that if you use another email service provider with a created address, including using SMTP with Branda, those emails cannot be logged and you will not see any stats here.
Email Account Limitations
Members whose sites we host can create up to 10 email accounts for each site to send and receive domain emails using any email client or cloud-based email service.
There is no additional charge for these email accounts, and the only limitations are:
- Email accounts are available only for sites we host.
- Email addresses can only be created for the primary domain (top-level only, like domain.com; not subdomains like sub.domain.com).
- Internationalized domain names are not supported. See the IDN section below for more details.
- Each hosted site can create ten domain email addresses. If more addresses are needed, we recommend using the Webmail service in your Hub, or a dedicated email service like Google Workspace or Zoho.
- Members cannot have domain email addresses and email forwarding addresses for the same domain.
- Each POP inbox is limited to 100MB of total storage with file attachments limited to 15MB each. Additional storage cannot be purchased. You can avoid hitting the storage limit by configuring email clients to delete emails from the server as soon as they are downloaded to the email client. Note that there is no notification sent if the storage limit is reached. See Email Accounts below for details.
- Our mail server imposes a hard limit of 10 emails per minute per source IP address. Take note if you are sending newsletters or mass-mailings to your users.
- It is not possible to import existing emails from another server.
Email Forwarding Limitations
WPMU DEV members can create up to 20 forwarding addresses for each site, and email forwarding does have its limitations:
- WPMU DEV can only forward emails for domains we host.
- Email forwarding only allows you to receive emails sent to an address you create. In order to send emails with your domain in the address, use the Email Account SMTP options discussed in this guide.
- Email forwarding and domain email cannot be employed at the same time for a single domain. Email can only be sent from one location, as determined by the domain’s MX records – email forwarding requires different MX records than standard email, so the two cannot co-exist on a single domain. If you try to create a forward for a domain that already has an email account configured on it, you will see a red notice like the below example to remind you of this.

POP and SMTP Only
Email accounts for WPMU DEV hosted sites are POP and SMTP email only. POP email sent to any address you create must be retrieved using an email client of your choice. That means that emails are downloaded to the email client you connect your email account to, and you read them on that client.
If you use a device-specific email client like Thunderbird, it may not be possible to access your emails from different devices. But if you connect your email account to a cloud-based email service like Gmail or Outlook.com, then your emails will be accessible from any device.
You may also want to consider using our email forwarding service, which can forward IMAP emails to the inbox of your choice.
If you prefer a full IMAP webmail service instead, you can set that up in the Webmail section in your Hub. See our Webmail documentation for details. Not sure which protocol is best for your project? You’ll find a great explanation of the differences between IMAP and POP3 email on our blog.
10.2 Email Accounts
Members whose sites we host can create up to 10 email accounts for each site to send and receive domain emails using any email client or cloud-based email service.
The following guidance covers creating email accounts, adding new MX records to the DNS files and connecting email accounts to some common email services.
Server Connection Info
When connecting an email account to a client, the server connection information you’ll need is the same for all email accounts for all members, with the exception of the specific email address, username & password, of course.
| Host | mailu.brouavo.host |
| SMTP Port | 587 |
| POP3 Port | 995 |
| Username | The email address you created |
| Password | The password you created for your email address |
You’ll find the connection info for each email account you have created in your Hub by clicking on the View Info button in the Connection Info column, as seen in the next chapter.
10.2.1 Creating an Email Account
WPMU DEV email is site-specific. In your Hub, click the site for which you wish to configure email. Click the Hosting tab, then click the Emails tab.

Once there, click the Email Accounts option to open the Email Account creation and management tool.
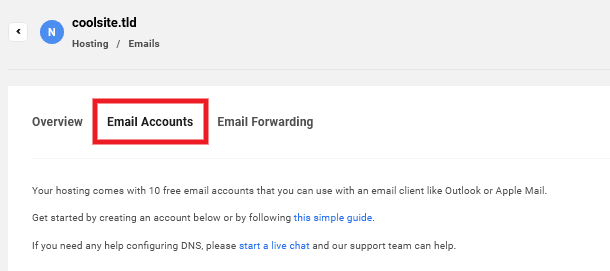
If you have not created an email address, click the Add email account button to get started.
IMPORTANT
Before you can create an email account, you must first ensure that you have added a custom domain name to your site and have set it as the primary domain. See our Domains documentation for details.

This will open the Add email account modal. Input the address you would like to create. This should be something like [email protected].

Copy the strong password provided or create your own password, and click the Add button to create your new email address.
This will generate your account and add all the information you need to connect to your email application.

Click the View Info button in the Connection Info column to pop open a modal window with the specific info you need to connect your email account to the email client of your choice.
Click the ellipsis icon for any email address if you need to send a test email, change its password or delete the address.
Internationalized Domain Names (IDN)
It’s important to note that internationalized domain names (IDNs) are not supported by our email service. Internationalized domain names are names containing non-latin characters, or characters with diacritics or ligatures.
If you are using such a domain as your primary domain, you will not be able to create an email account, and you’ll be prompted to switch your primary domain to the standard ASCII equivalent (no special characters) before you can create an email account.
A notice will appear to remind you of this limitation.
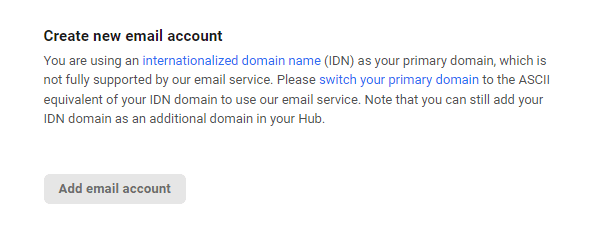
However, you can still add your IDN as an additional domain in your Hub for your users who may be used to that domain. It will simply resolve to the ASCII domain you set as primary.
10.2.2 Email Aliases
Email aliases are a simple way to receive email sent from multiple addresses at the same email account. You need to have already set up at least one email account in your Hub before you can create aliases.
For example, if you have already set up an email account for [email protected], you could create various aliases to use like [email protected], [email protected], [email protected], etc, and receive mail from all of those at [email protected]
To get started, click the Add Alias button in the Active Email Aliases section just under Active Email Accounts.

In the modal window that pops open, enter the alias name you wish to use in the Alias field. Then select the actual email account this alias should send to in the Email dropdown, and click Add.

Check the Catch All ? checkbox if you want this new alias address to catch all emails sent to any address at your domain that does not yet exist.
In other words, if you have an email account set up for [email protected], any email sent to that address will arrive in that account’s inbox. But if someone sends an email to [email protected], and there is no account set up for that address, it would arrive in that same inbox as well if it set as a catchall address.
You’ll then see your new alias appear in the Active Email Aliases section, and can now use that alias anywhere you like. Any email sent to that address will be received at the actual email account associated with it.

To delete an existing alias, click the Delete button in the alias row, then click the Delete button in the confirmation modal that pops open.
10.2.3 Updating DNS MX Records
In order to send and receive emails from your new email address, you will need to add the MX info to your DNS records. For information on adding and managing your DNS records in Hub 2.0 visit the DNS records manager documentation.
MX Records are Mail Exchange Record use specify the mail server responsible for accepting email messages on behalf of a domain name.
When adding the MX record to your DNS records:
- Set the Type to MX
- Set Hostname to @ – this points the record to the root name
If your DNS manager does not accept @ in the Hostname field and requires the domain name, be sure to include the period at the end of the name; without it, email will not work. - Value for MX records managed by WPMU DEV is mailu.wpmudev.host.
Include the period at the end here as well, even though your registrar might remove it once the record is registered. - For DNS records on WPMU DEV the Priority should be set to 1
- TTL (Time to Live) defaults to 14400 seconds
Note that if you have already created an email account and have added the required records to your domain, you do not need to add them again for additional email accounts you create for the same domain. Similarly, if you are managing the DNS for your domain in your Hub and click the Add DNS Records button to automatically add the needed records, you do not need to add them again manually.

Google Workspace & Google Domains
If you are a Google Workspace user and/or are setting up MX records for a domain hosted by Google Domains, you’ll want to configure DKIM and SPF records before configuring DMARC. According to Google, DKIM and SPF should be authenticating messages for at least 48 hours before turning on DMARC.
If you are having trouble with the DKIM and/or DMARC entries after 48 hours, you can try editing those 2 entries so they do not include the domain name in them as provided in your Hub. Edit them so they look like the below example:
If you get an error in your Hub saying that the SPF record is missing, you can try deleting that record and re-adding it as a TXT record instead.

10.3 Connecting Email Accounts
This section covers how to connect your WPMU DEV Hosted Email Accounts to some of the more popular mail client applications for sending and receiving emails.
If you do not see your email application on the list or are having trouble connecting your Email Account, contact live support for 24/7 Hosting, DNS, and Email assistance.
Important
Regardless of the email client you use, please be sure to configure it to remove email from the server once it is fetched by the client. Each inbox is limited to 100MB of total storage, so if emails are not removed once they are downloaded, that can fill up very fast, and no notification is sent if that storage limit is reached. Each email client will have an option for that, but it may differ from one client to another. Check the configuration guides below for examples.
10.3.1 Apple Mail
Follow these instructions to connect your email account to the Mail application included with your Mac computer or Apple iOS devices.
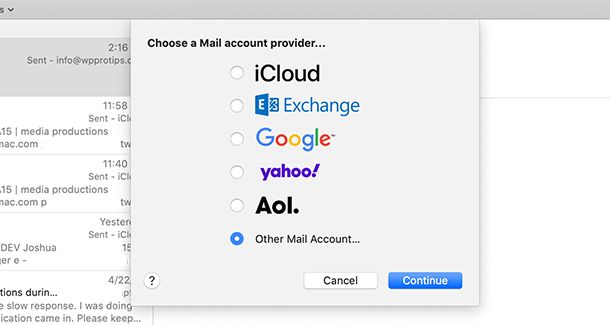
Choose the Add an account option or (+) icon in the Mail application preferences for a laptop or desktop computer, or from the preferences in your iOS device select, Add Account.

Choose the Other option in the list of clients.
Enter:
- Your name
- Email address associated to your WPMU DEV email account
- The password you created or the strong password generated by when the email account was created
And click the Sign-in button. This will display the message, Unable to verify the account name or password, message.
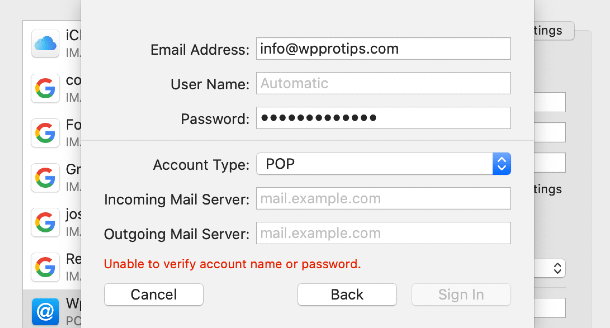
Be sure to switch account type to POP and for the incoming and outgoing mail servers input mailu.wpmudev.host.
Select the Apps you want to use with the account and click done.
You should now be able to send and receive emails from your Apple devices using the Mail application.
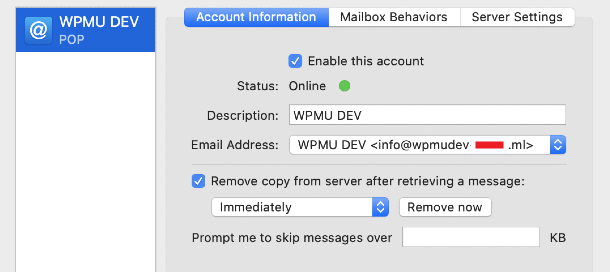
You can access additional configuration options for your POP account in the mail configurations options.
Make sure to check the Remove copy from server after retrieving a message box to ensure your WPMU DEV inbox does not hit the 100Mb limit.
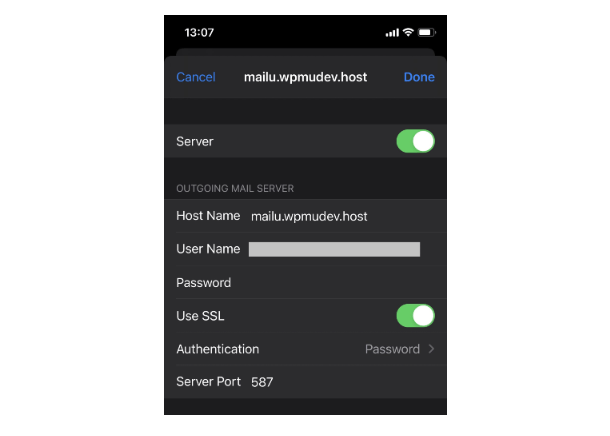
If you’re setting this up on an iPhone, the corresponding setting for the above can be found under Advanced > Incoming Settings where you’d select Delete from server > When removed from the inbox.
You may also need to double-check that SMTP is enabled for this account (with correct username & password), and SSL is set to port 587.
10.3.2 Gmail
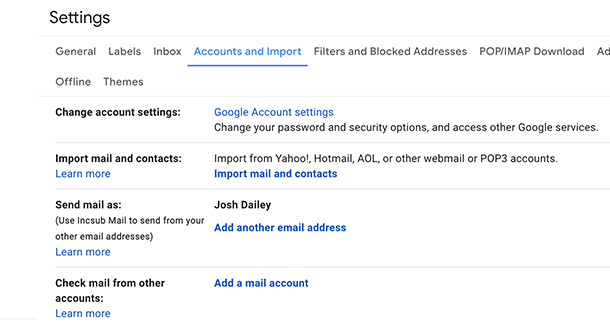
To send and receive emails from your WPMU DEV Email Account in Gmail, open Gmail in your browser and click the settings (gear) icon in the top right of the screen.
Click the Accounts and Imports tab and under the Check mail from other accounts option, click the Add a mail account link.
In the “Add a mail account” window, enter the email address from your WPMU DEV hosting account and click next.

If you see the following step, choose the Import emails from my other account (POP3) and click next.

Then enter your WPMU DEV email account credentials and server information:
- Username – Default is your email address
- Password – The password you created or the strong password generated when creating the Email Account
- Pop Server – mailu.wpmudev.host
- Port – 995
- And check the box always use a secure connection (SSL) when retrieving mail.
- Make sure to uncheck the Leave a copy of retrieved message on the server box to ensure your WPMU DEV inbox does not hit the 100Mb limit.
- Click add account

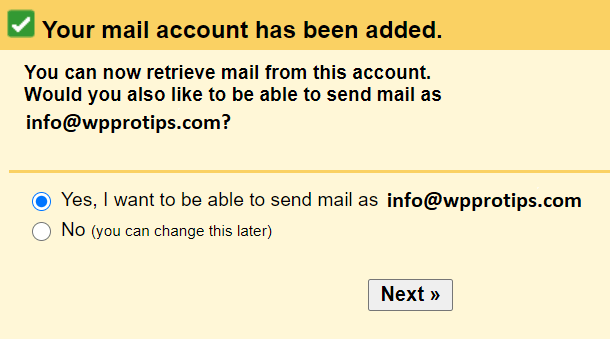
If you would like to also be able to send emails from your Gmail account, choose the Yes, I want to be able to send mail as option.
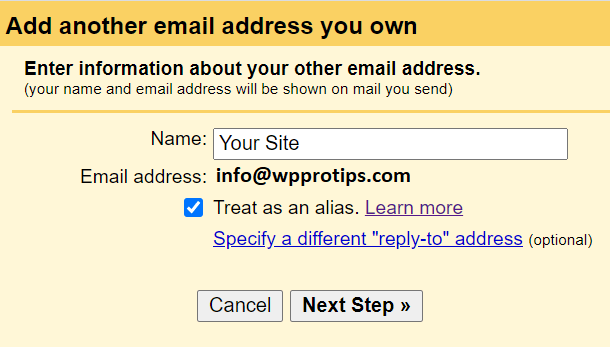
You will then be asked to enter information about your other email address. Make sure to check the Treat as an alias box so that messages received from your WPMU DEV email account will appear in your Gmail inbox. Click Next Step when this is done.
Configure the send options:
- SMTP Server – This is mailu.wpmudev.host
- Port – 587
- Username – Default is your email address
- Password – The password you created or the strong password generated when creating the Email Account

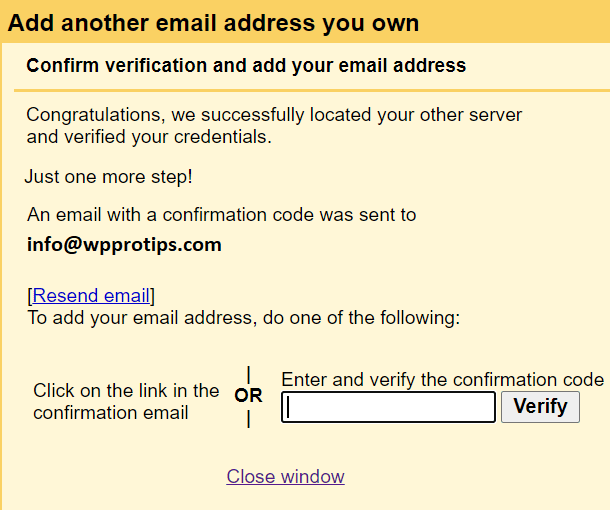
Click the Add account button. You’ll then receive a confirmation email in your Gmail inbox with the verification link/code you need to confirm this action.
Minimize (don’t close) the “Add a mail account” window, go to your Gmail inbox and verify the account by either by clicking on the verification link or by copying the confirmation code and pasting it in the corresponding field in the “Add a mail account” window.

You should now be able to send and receive emails from the Gmail client.
If you encounter an issue connecting to Gmail, contact WPMU DEV live chat support 24/7.
10.3.3 Outlook
Classic Outlook Only
This chapter includes instructions for configuring your hosted POP3 email account in Classic Outlook only. The New Outlook app, which replaces the old Windows Mail app, does not have the option to remove emails from the server once they’re downloaded. Consequently, we do not recommend using the New Outlook app for POP3 accounts.
If you do not have access to Classic Outlook and can only use New Outlook, you may want to consider using our IMAP Webmail service instead.
To send and receive emails from your WPMU DEV Email Account in Classic Outlook, begin by clicking the File tab in the main navigation bar.

Then click the + Add Account button.

In the modal window that pops open, enter the Email address you want to connect. Under Advanced Options, check the box where you see Let me set up my account manually. Then click Connect.

On the next screen, select the POP option.

Next, you’ll enter the connection information for your email account. In your Hub, click the site associated with your WPMU DEV email.
Then, under Hosting > Emails, you’ll find all the Active Email Accounts for that site listed under the Email Accounts tab.
Click the View Info button next to the email account you wish to use to view the connection information.

Copy the connection information into the appropriate fields in Outlook’s POP setup screen, and click Next when you’re done.
- Servers – The same server, or host, is used for both incoming and outgoing email, so enter mailu.wpmudev.host into both server fields.
- This server requires an encrypted connection – Check this box.
- Incoming port – The incoming port for all WPMU DEV email accounts is 995. So, enter that number into the incoming mail port field.
- Outgoing port – The outgoing port for all WPMU DEV email accounts is 587. So, enter that number into the outgoing mail port field.
- Encryption method – Select the STARTTLS option.

On the next screen, enter the Password for your hosted email account, and click Connect.

When the screen refreshes after the account connection is successful, click the Done button.
Now you want to ensure that emails are removed from the server once they’re downloaded so you don’t hit the storage limit. To do that, click the File tab again in the main navigation bar.
Then select the Account Settings option from the Account Settings dropdown.

In the modal window that pops open, select the account you just connected and click the Change tab.

Uncheck the box where it says Leave a copy of messages on the server. Then click Next and Done.

You can now begin sending and receiving emails from the Outlook client using the connected WPMU DEV hosted email address.
10.3.4 Yahoo!
NOTE
Yahoo is undergoing a redesign and is not supporting 3rd-party POP accounts. Visit Yahoo! Mail for more information and updates.
10.3.5 Thunderbird
To send and receive emails from your WPMU DEV Email Account in Thunderbird, open the Thunderbird application on your desktop and click either the Email button or + New > Existing Email Account under the ellipsis icon at top-right.

In the Set Up Your Existing Email Address module, add your email credentials. Then click the Configure manually link.
- Your full name – The name you would like shown to others
- Email Address – The email address you are hosting with WPMU DEV.
- Password – The password you created or the strong password generated when creating the Email Account.

On the Manual configuration screen, set up the incoming and outgoing email options.
Incoming configuration:
- Protocol – POP3
- Hostname – mailu.wpmudev.host
- Port – 995
- Connection security – SSL/TLS
- Authentication method – Normal password
- Username – The email address you are hosting with WPMU DEV

Outgoing configuration:
- Hostname – mailu.wpmudev.host
- Port – 587
- Connection security – STARTTLS
- Authentication method – Normal password
- Username – The email address you are hosting with WPMU DEV

Click the Re-test button at the bottom and a success message should appear above the forms.

Next, instead of clicking the Done button, click the Advanced config link to save the current configuration and be redirected to the Server Settings page.

On the Server Settings page, uncheck the Leave messages on server box to ensure your WPMU DEV inbox does not hit the 100Mb limit.

Note that if you change the password for your email account in your WPMU DEV Hub, and have saved passwords in your Thunderbird client, you’ll want to update the password in Thunderbird. Select Preferences in the main menu, then go to Privacy & Security > Passwords and click the Saved Passwords button.

10.3.6 Mailbird
If you already have Mailbird installed with an existing account, jump to Add a new account to Mailbird below for instructions on adding a new account for your new WPMU DEV email address.
Adding your first account to MailbirdCopy heading anchor to clipboard
Once you have the Mailbird client installed, you’ll need to add an account. Enter any name you like, then enter the email address of the WPMU DEV email account you want to use with this client, and click Continue.

On the next screen, select Username and password as the Authentication method.
Then enter the following information into the indicated fields for the Incoming Server settings:
- Server type – Select POP3
- Server name – Enter your email account’s Host name: mailu.wpmudev.host
- Encryption – Select SSL/TLS
- Username – The username as indicated on the Connection Info screen for your email account in your Hub. It would be the email address you created.
- Password – The password associated with your email account. If you forgot what that was, you’ll need to create a new one for that email account in the Active Email Accounts section of your Hub.
- Port – Should be 995

Enter the following information into the indicated fields for the Outgoing Server settings:
- SMTP server – Same as the Incoming server setting above: mailu.wpmudev.host
- Encryption – Select STARTTLS
- Requires authentication – Box should be checked.
- Username – Same as above.
- Password – Same as above.
- Port – Should be 587.

For the POP3 settings section, be sure to uncheck the option to Leave a copy of messages on the server. This ensures that you’ll never hit the 100Mb limit for your email account on WPMU DEV servers.
Click Continue when you’re done, and you should be redirected to your new Mailbird inbox.
Adding a new account to MailbirdCopy heading anchor to clipboard
If you are already using Mailbird and wish to add a new account for your WPMU DEV email address, the settings would be the same as above.
To add an account, select Settings from the burger icon at top-left.

Then, in the window that pops open, click the Add button, and follow the same instructions as above to add the new account.

10.4 Email Forwarding
Copy chapter anchor to clipboard
Email forwarding is a simple way to use an existing email account, such as Gmail, Outlook, Rackspace, or other service, to receive emails from an alias address that includes your domain name. This is ideal for individuals and small businesses concerned with maintaining a professional online reputation without incurring email hosting fees.
In simplest terms, using our forwarding tool, you can create an address like [email protected], share that email address on your site (or anywhere you want, really), and we will forward emails sent to that address to your Gmail, Outlook or other email address.
Note that you can also create a forwarder to redirect email from a secondary domain to the Primary domain of the same WPMU DEV hosted site in your Hub.
For example, if you have domain.tld set as the Primary domain for a site, and have anotherdomain.tld added to that same site, you can create a forward for [email protected] that will send to [email protected].
Creating A ForwardCopy heading anchor to clipboard
Click the Emails tab, then click Email Forwarding to open the email forwarding creation and management tool.

Note the following information, displayed on that screen, which you may need to configure a forwarding address:
Record Type: MX
Name/Host/Alias: @ or leave blank
Value/Destination: mail-forward.wpmudev.host
TTL: 3600
Priority: 1
Click the Add email forward button in the bottom left corner. In the screen that appears, enter the following information into the fields provided:
- Email Sent to – In this field, enter the user portion of the address, which is everything before the @. Do not include the @.
- Domain – In this field enter the domain portion of the email address, which is everything after the @. Do not include the @.
- Will be forwarded to – Enter the entire email address to which you want emails forwarded.
You can only configure one forwarding address at a time, but you can add up to 20 per site. If you want to forward multiple addresses to a single account, simply create an email forward for each using the same “forwarded to” address.
IMPORTANT
Emails can be forwarded to a single address only. If you need emails to be forwarded to multiple addresses, you will need to configure CC or BCC options at the “forwarded to” address for the additional destinations.
When ready, click the Add button.

Verify the Forward to AddressCopy heading anchor to clipboard
Within a few minutes, WPMU DEV will send an email to the forwarded to address that contains a verification link. You must click this link to activate forwarding for the newly-created address.
If you want to whitelabel this email and ensure it is branded with your brand, and not WPMU DEV, you’d want to set up the forward in the Hub Client plugin installed on your own domain.
Configuring Forwarding MX RecordsCopy heading anchor to clipboard
The verification email also includes important instructions for editing the DNS information for the applicable domain. Typically, these records are maintained by the registrar where you purchased your domain, unless you are using our DNS management tool, which we strongly encourage.
You can find guidance on working with the DNS records for several popular DNS registrars here.
It is important to note that once you edit DNS, it may take some time (up to 24 hours in rare cases) for the DNS changes to take full effect and for the email forward to begin working.
IMPORTANT
Do not remove or change any existing MX records from your DNS unless you are certain it is safe to do so.
10.5 Using SMTP To Send Emails
Copy chapter anchor to clipboard
The easiest way to avoid our sending limits or to change the From email address on transactional emails is to use our Branda plugin, which has an easy SMTP tool built right in 🙂
- See here for how to configure SMTP sending in Branda.
- See here for how to use Gmail or Google Workspace (formerly G-Suite) to send emails.
10.6 IP on a RBL Blocklist?
Copy chapter anchor to clipboard
You may occasionally find that your server IP address has wound up on some email Realtime Blackhole List (RBL). This is actually nothing to worry about as your email is not sent from your server IP address.
We use cloud providers for our hosting servers, which, by their very nature, are often the target of abusers who use them for spamming, phishing and other bad stuff. Whole ranges of cloud provider IPs are on various RBLs 90% of the time in our experience.
Like most every cloud provider out there, we have recently been the victim of a RBL (UCEPROTECT) that has gone rogue and has started blacklisting complete IP ranges for no good reason, blackmailing and extorting money from those who want to get delisted. This is a widely known problem, and fortunately no ISP with any good reputation uses this RBL anymore, except Microsoft. Why they use them still we have no idea. See this excellent article on Sucuri’s blog for details.
It is for that very reason we don’t host or send email from our hosting servers. By default we send email from your site via MailChannels, a 3rd party email service that helps us maintain extremely good deliverability. We have lots of abuse prevention built into that as well. For example, outgoing site email is filtered for spam/malware, we have rate limits in place by plan, we automatically warn and shut down email for hosted sites that get too many spam/abuse complaints, and we suppress email sending to invalid or permanently bounced addresses.
The email service included with hosted sites is designed only for the basic transactional email stuff required by any WordPress site. Consequently, we recommend to anyone who needs more features, or who needs business critical deliverability, to use our Webmail service (which includes fraud prevention, scaling, filtering, throttling, etc.), or any other email hosting provider that you may prefer.
Cloudflare WorkaroundCopy heading anchor to clipboard
You can workaround an RBL problem by routing your domain through Cloudflare.
With the DNS Proxied option enabled for your A & AAAA records, your domain’s real IP address will be undiscoverable, and RBL blocklist problems should be a thing of the past.

10.7 Get Support
Copy chapter anchor to clipboard
If you still have questions or need assistance after reading this document, please don’t hesitate to contact our support superheroes using the available options under the Support tab in your Hub or via the Support tab in your WPMU DEV Dashboard.


0 Comments