Secure Sockets Layer (SSL), and the newer Transport Layer Security (TLS), is a security technology that establishes an encrypted link between servers, browsers and mail clients.
- SSL – (Secure Sockets Layer) The standard for keeping an internet connection secure and protecting sensitive data that is being sent between two systems. It prevents hackers from seeing or changing any information being transferred.
- TLS – (Transport Layer Security) The updated, more secure, version of SSL.
- HTTPS – (HyperText Transfer Protocol Secure) HTTPS is what is in the URL when a website is secured by an SSL certificate. Details about the certificate can be viewed by clicking on the lock symbol next to the URL in the search bar.
All WPMU DEV sites use and enforce the https:// protocol by default. This way, all communication between the website and the client is made under a secure layer to avoid man-in-the-middle and other similar attacks.
Sites without a valid SSL are considered potentially unsafe, so WPMU DEV requires and provides SSL certificates for all sites we host.
Not Hosting with WPMU DEV?
If you haven’t set up your WPMU DEV hosting account yet, visit WPMU DEV Hosting and explore the features of our best-in-class managed hosting for WordPress and see the pricing plans.
12.1 Types of SSL Certificates
WPMU DEV provides two types of SSL certificates at no additional cost to you. These certificates are provisioned by Let’s Encrypt and automatically renew every 90 days.
- Regular SSL certificate – For single sites and custom domains.
- Wildcard SSL certificate – For WordPress subdomain and subdirectory multisite installs.
You can also optionally provide your own Custom SSL Certificate if you need to.
Bot Fight Mode Enabled at Cloudflare?
If you have Bot Fight Mode enabled for a domain you’re using on a WPMU DEV hosted site, issuance or renewal of LetsEncrypt SSL certificates will fail because that feature is designed to block all bots. That includes the LetsEncrypt user agent. So you’ll want to allow that user agent in your WAF rules. See Bot Fight Mode Enabled? in our registrar guides for more information.
12.1.1 Regular SSL Certificates
A regular certificate is used to secure domains destined to be used on single site installs, or custom domains added to a WordPress multisite install.
When a new site is created with a temporary tempurl.host domain, or a custom domain is added to any existing site, we automatically provision and install a regular SSL certificate on it.
For most sites, SSL certificates will be applied in a matter of minutes, but the process can take hours or, in rare cases, a full day, depending on how quickly your DNS settings propagate around the world.
We renew these certificates automatically every three months.
As soon as the certificate is added to a site, we force all traffic over HTTPS only.
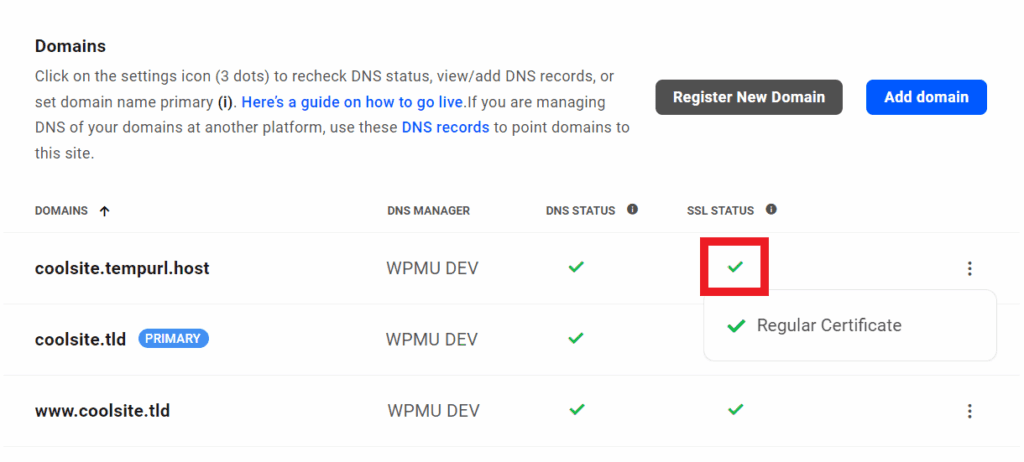
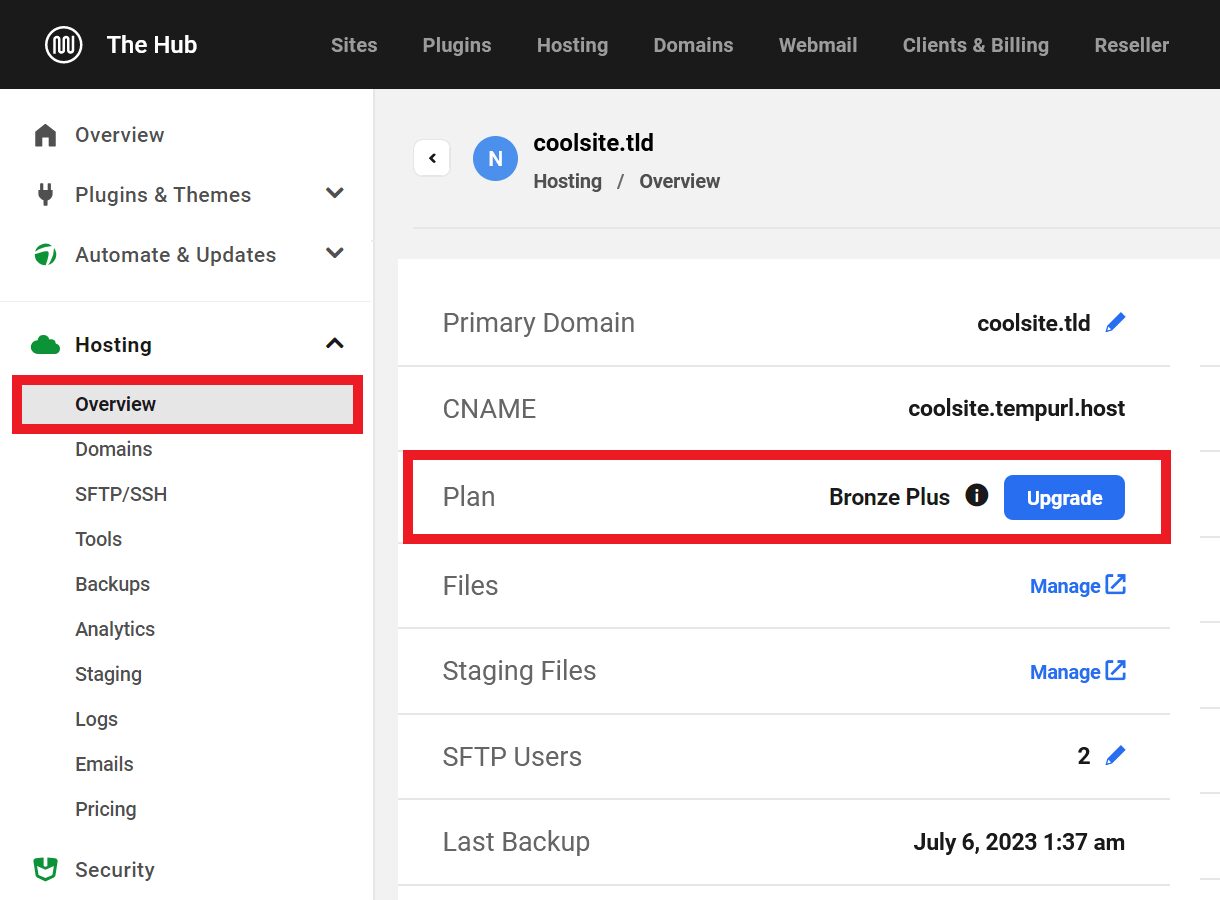
You can easily verify that an SSL certificate has been provisioned on your domain. In your Hub, click the Hosting tab, followed by the Domains tab.

There, you’ll see a green check mark in the SSL Status column. When you hover your mouse over the green check icon in the SSL Status column, for either the temporary tempurl.host domain or a custom domain you’ve added, you’ll see it automatically has a regular SSL certificate issued for it.
12.1.2 Wildcard SSL Certificates
WPMU DEV provides free wildcard SSL certificates for both subdomain and subdirectory multisite networks. This means that even if you have a subdirectory multisite, you can map subdomains to subsites in it, and have them all covered by the same wildcard certificate.
Recommended Reading
Read our blog, Free Wildcard SSL for Multisite Subdomains, for a guide to setting up Wildcard SSL Certificates on your multisite.
Note that a subdomain multisite can be developed without a wildcard certificate, but if you take the network live without one, your subdomains will show a security error when visitors attempt to access them.
Generating the Wildcard Certificate
To generate a free wildcard certificate, you need only add a single record to your primary domain’s DNS and then recertify the SSL.
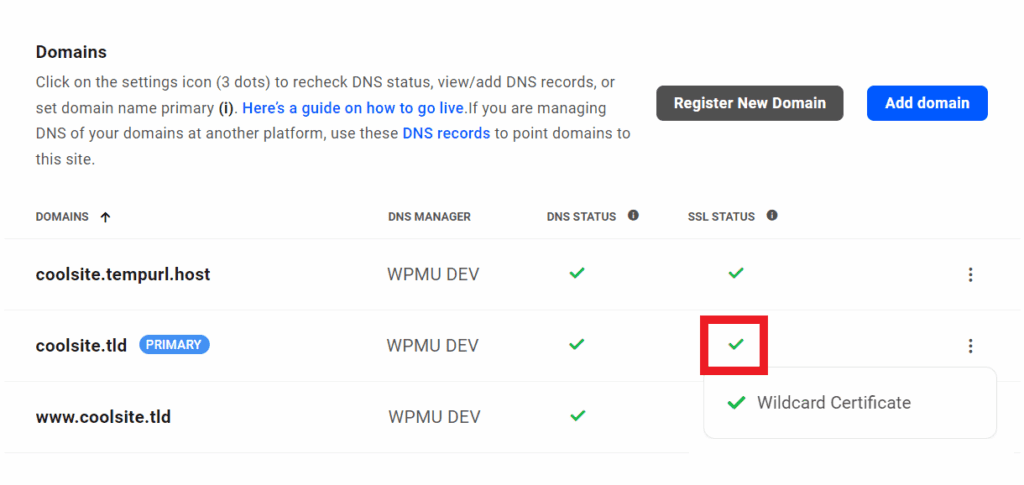
In your Hub, click the Hosting tab, followed by the Domains tab.

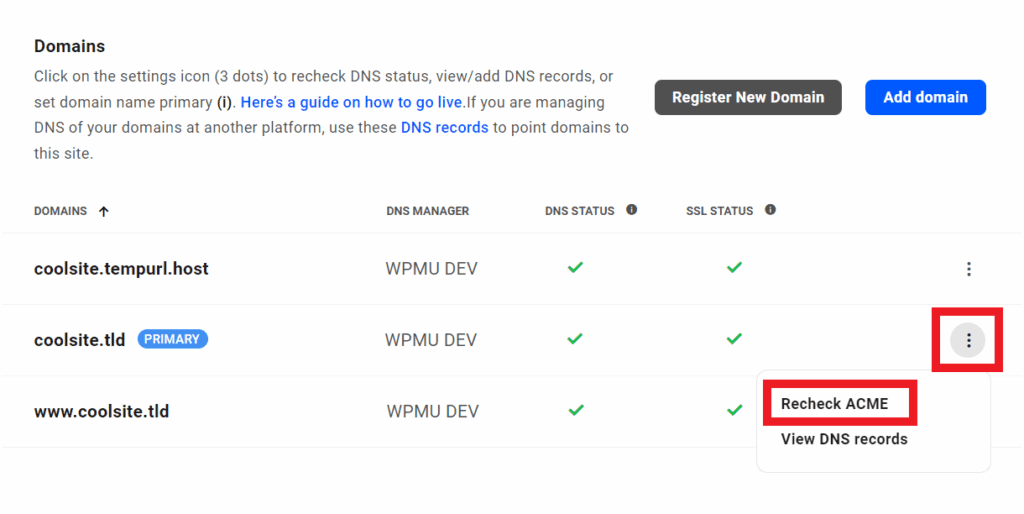
When you hover your mouse over the icon for the custom domain you have added and want to use as the primary domain, you’ll see it has a regular certificate automatically provisioned. But there is a prompt there to remind you that if you want to use a wildcard certificate instead, you need to add the required CNAME record to your domain’s DNS records.

Once the required CNAME has been added to the domain’s DNS, you’ll then need to click on the Recheck ACME option, in the dropdown under the three-dot icon, for the system to automatically verify the DNS and generate the wildcard certificate for your domain.
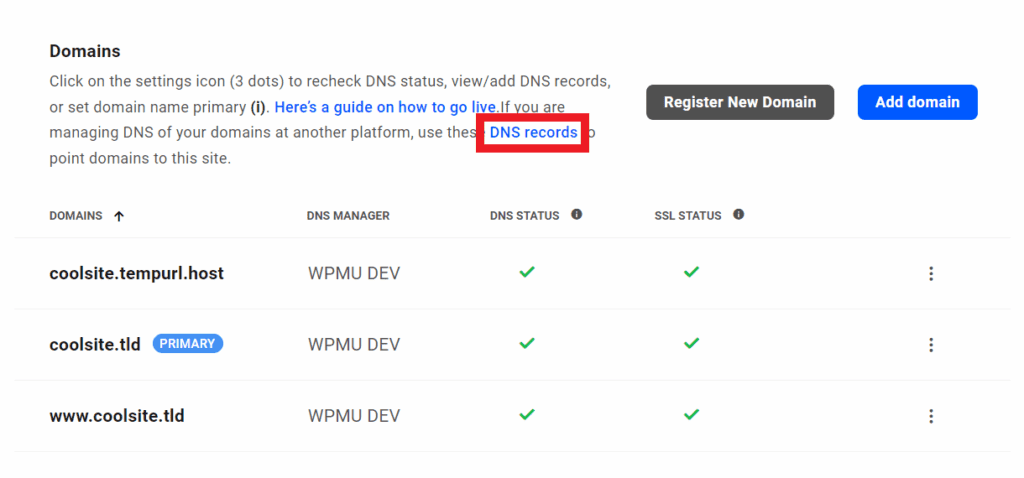
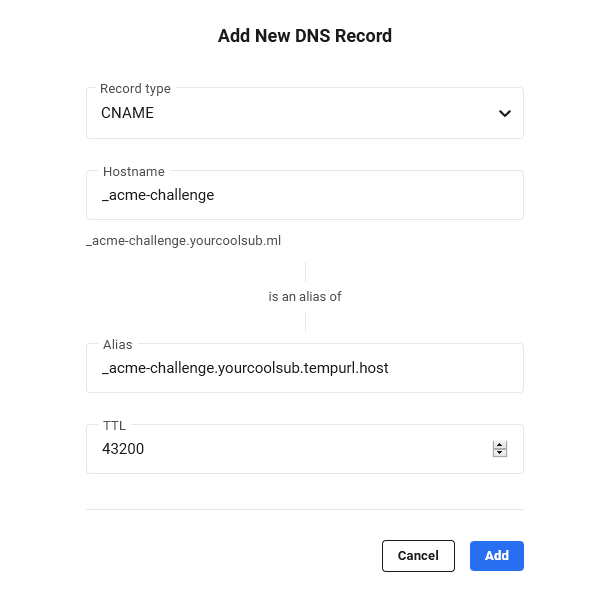
To get the info you need to add to your domain’s DNS, click the DNS records link in the description at the top of the screen.

That will pop open a modal window where you’ll want to locate the CNAME (optional for wildcard SSL certificates) record, which has two parts: a hostname of _acme-challenge, followed by the actual record.

The hostname and the record must be copied to your DNS. If your DNS is connected to the Hub 2.0 DNS feature, follow the guidance below to quickly update your DNS.
If your DNS is managed elsewhere, most commonly your domain registrar, then see our Registrar Guides documentation, where we have compiled DNS guidance for several popular providers. If your provider is not covered, check with your registrar for help editing your DNS.
PRO TIP
If you are adding the _acme-challenge CNAME record for a Wildcard Certificate in your CloudFlare account, be sure that record is NOT proxied.
Add Wildcard DNS for Subdomains
You need to add the following Wildcard DNS record, to map all your subdomains like careers.coolsite.tld or blog.coolsite.tld to the main domain coolsite.tld, so you don’t need to add individual DNS records for every subdomain.
If your DNS is managed by WPMU DEV, to get the info you need to add to your domain’s DNS, navigate to Hosting -> Domains and click the DNS records link in the description at the top of the screen.
That will pop open a modal window where you’ll want to locate the A record. The IP mentioned must be copied to your DNS.

If your DNS is managed elsewhere, most commonly your domain registrar, then see our Registrar Guides documentation, where we have compiled DNS guidance for several popular providers. If your provider is not covered, check with your registrar for help editing your DNS.
For a registered domain, in the Domains tab, click the Update DNS option for the domain that serves as your multisite’s primary domain to view its DNS records.
For a connected domain, click the Manage DNS option for the domain that serves as your multisite’s primary domain to view its DNS records.
Click the Add Record button to add a new record and select the A Record option.
Now, in the Hostname field, enter *, and in the IPv4 Address field, paste the IP address of the A record you copied from the Domains tab for your site.

Click the Add button to save the new A record.
Using WPMU DEV DNS Manager
Click the Domains item in the Hub main navigation to open your Domains manager. Then click the Registered Domains tab if you want to update DNS for a domain purchased through WPMU DEV, or click the Connected Domains tab for a 3rd-party domain that you’ve connected to your Hub.

For a registered domain, click the Update DNS option for the domain that serves as your multisite’s primary domain to view its DNS records.
For a connected domain, click the Manage DNS option for the domain that serves as your multisite’s primary domain to view its DNS records.
See the Manage DNS chapter in our Domains doc for additional guidance with this process if needed.
Click the Add Record button to add a new record and select the CNAME Record option.

Copy the Hostname value shown on the Domains tab for your site and paste it in the Hostname field for the new CNAME record in the DNS panel. Copy the Record value you see on the Domains tab and paste it in the Is an alias of field. Click the Add button to save that new CNAME record.
Once you’re done, allow a few minutes for the DNS change to propagate and click the Recheck ACME option as noted above. You should then see that the custom domain now shows SSL as being secured by a wildcard certificate, and you can set it as the primary for your multisite.
Now, when you load any subsite in your multisite, you’ll see that it too is secured by the main domain’s SSL certificate. In other words, all of these would now be secured by the same wildcard SSL certificate in either a subdomain-based or subdirectory-based multisite:
mainsite.tldsubsite.mainsite.tldmainsite.tld/subsite
12.1.3 Custom SSL Certificates
WPMU DEV also allows you to add your own custom SSL certificate to your site if you wish. This must be done by our hosting support team though, as there is currently no user interface for this.
Note that we do not add any custom SSL certificates that are valid for less than 1 year.
To get this done, you will first need to submit a Certificate Signing Request (CSR) to a Certificate Authority.
Certificate providers, typically, have tools or will assist with generating the CSR. Alternatively, you can use a free service like certificatetools.com/csr-generator/. When you obtain the CSR, be sure to save a copy of the Private Key.
Use the CSR to purchase the SSL certificate, which will provide you with the following required information:
- Private Key (created during CSR process)
- Certificate
- Certificate chain
Your SSL provider should be able to provide you with those if they create a CSR using their interface.
You can start a live chat or create a support ticket to provide us with the information.
12.2 FAQs, Errors & Troubleshooting
Are the SSL certificates you provide free?
Yes they are. We provision SSL certificates from Let’s Encrypt at no cost to you.
How much time does it take for an SSL certificate to be installed?
For most sites, SSL certificates will be applied in a matter of minutes, but the process can take hours or, in rare cases, a full day, depending on how quickly your DNS settings propagate around the world. However, If the SSL Certificate isn’t issued within 24-48 hours after application, please contact our support so our hosting team can investigate and fix things up for you.
Do I need to renew SSL certificates manually?
No, we take care of that for you. As long as your site or domain exists on WPMU DEV hosting, we renew the Let’s Encrypt certificates automatically every 3 months.
Do I need to use custom SSL when using e-commerce?
No you do not. WPMU DEV has you covered as we provision SSL certificates automatically on every site we host. However, you are free to submit a support request for our hosting team to install a custom SSL certificate should you so wish.
SSL is installed, but I don’t see a padlock. Why?
That can be due to any of the following reasons. See the corresponding FAQs below.
- The DNS for your domain has not yet fully propagated
- SSL provisioning has been disabled on the domain temporarily
DNS looks good to us, but has not yet propagated across the internet.
The DNS for your domain has not yet fully propagated, so the SSL certificate can not yet be provisioned.
In this case, you would see a yellow icon in the SSL Status column for the domain in your Hub or Hub Client with the following message in a tooltip: DNS looks good to us, but has not yet propagated across the internet.
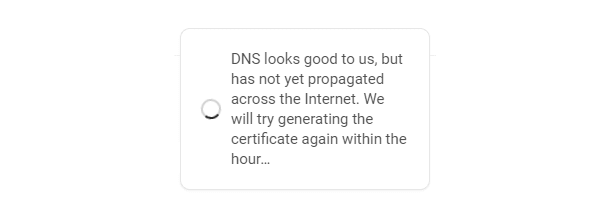
Our system will check again within the hour and provision the SSL certificate automatically once DNS has fully propagated. So you need only wait until that occurs. See How much time does it take for an SSL certificate to be installed above for more info.
SSL Disabled. Too many failed attempts.
SSL provisioning has been disabled on the domain temporarily due to too many successive attempts to enable it.
In this case, you would see the following error message under the SSL Status column in your Hub or Hub Client: SSL Disabled. Too many failed attempts.

This can happen if the DNS records are incorrect or, in rare cases, if Let’s Encrypt has rate-limited requests for your domain, or if the IP of your site has been blocked by them.
You’d want to double-check that the DNS records (A, AAAA, CNAME) that you’ve set up at your domain registrar are correct and that they have fully propagated. You can use a free online tool like dnschecker.org for that.
If you still get the SSL Disabled message after confirming DNS is all good, please contact support so our hosting team can investigate and fix things up for you.
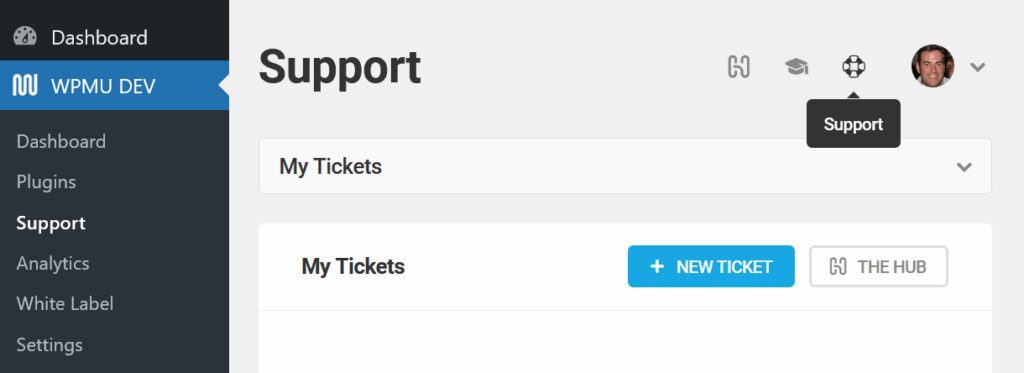
12.3 Get Support
If you still have questions or need assistance after reading this document, please don’t hesitate to contact our support superheroes using the available options under the Support tab in your Hub or via the Support tab in your WPMU DEV Dashboard.

0 Comments