This guide covers in detail the BROUAVO expert services offered by our skilled team of in-house WordPress experts.
Services include optimizing your site’s performance & monitoring it proactively, clearing out malware & handling security issues, and even building custom tailored scripts to extend your site’s functionality.
To avail yourself of our expert services, you need to be a BROUAVO member. You can become one by subscribing to any of our membership plans.
11.1 On-Demand Development
Our team of experienced in-house developers will help you if you need any custom CSS or code functionality for your WordPress site.
Be sure to review our Podmínky služby for additional information and to ensure your request is within scope.
To make a request for on-demand development, navigate to the Expert Services page in your Hub by clicking the Expert Services button in the main menu, then click the Get Started button in the On-Demand Development section.

Next, choose from among the available pricing plans. Each plan offers a specific number of custom development requests per month.
- Lite – You can make up to 5 custom development requests per month.
- Starter – You can make up to 10 custom development requests a month.
- Pro – You can make up to 20 custom development requests per month.
- Pokročilé – You can make up to 50 custom development requests a month.
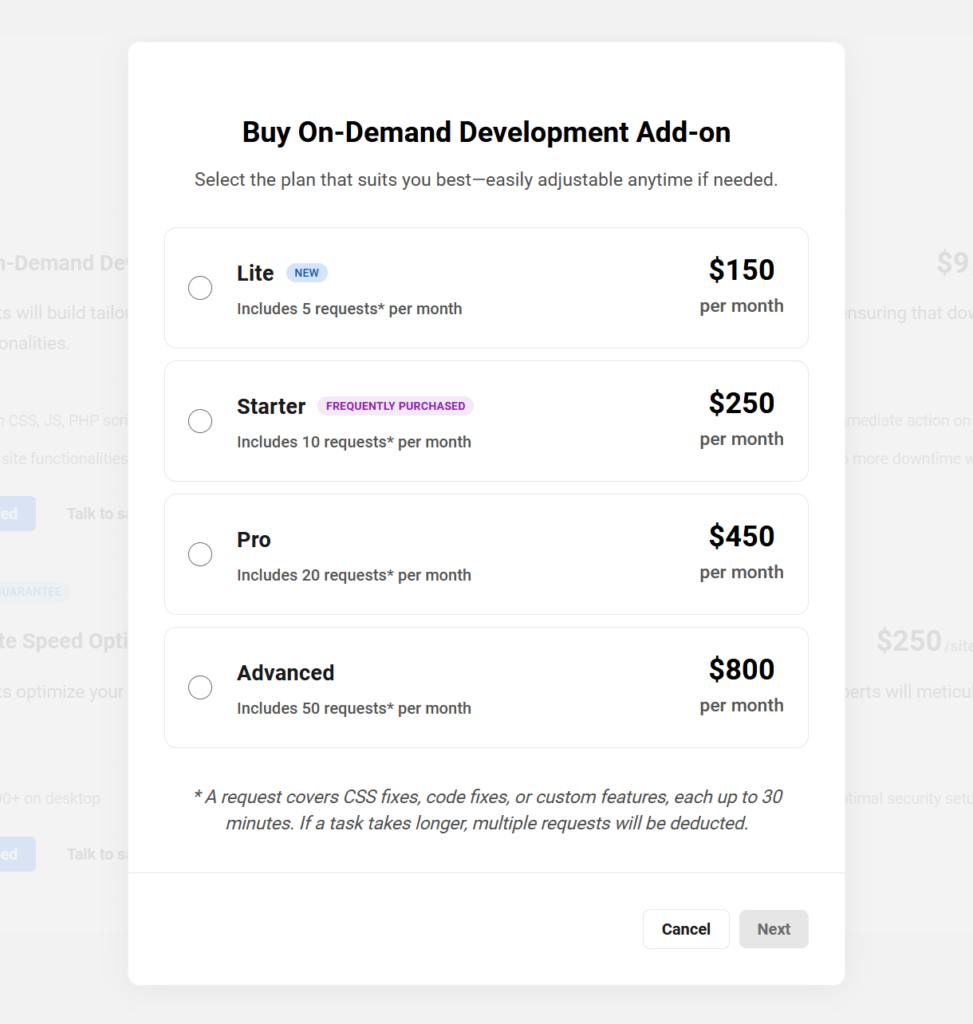
A single request can be used for CSS fixes, code fixes, nebo custom features, each taking up to 30 minutes. If a task requires more time, additional requests will be used.
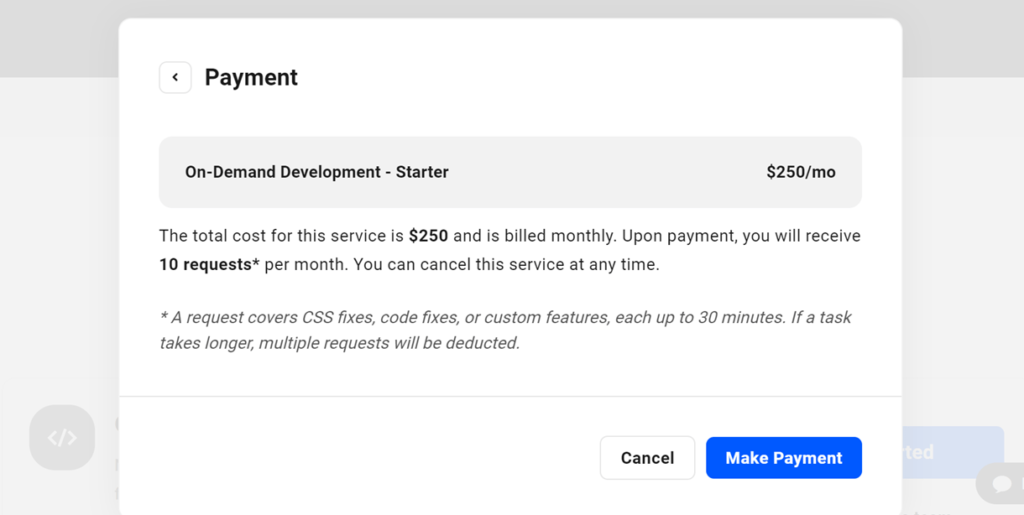
Select the plan that suits your needs and click Make Payment. Note that if you have any Account Credits, those will be used to purchase the add-on.
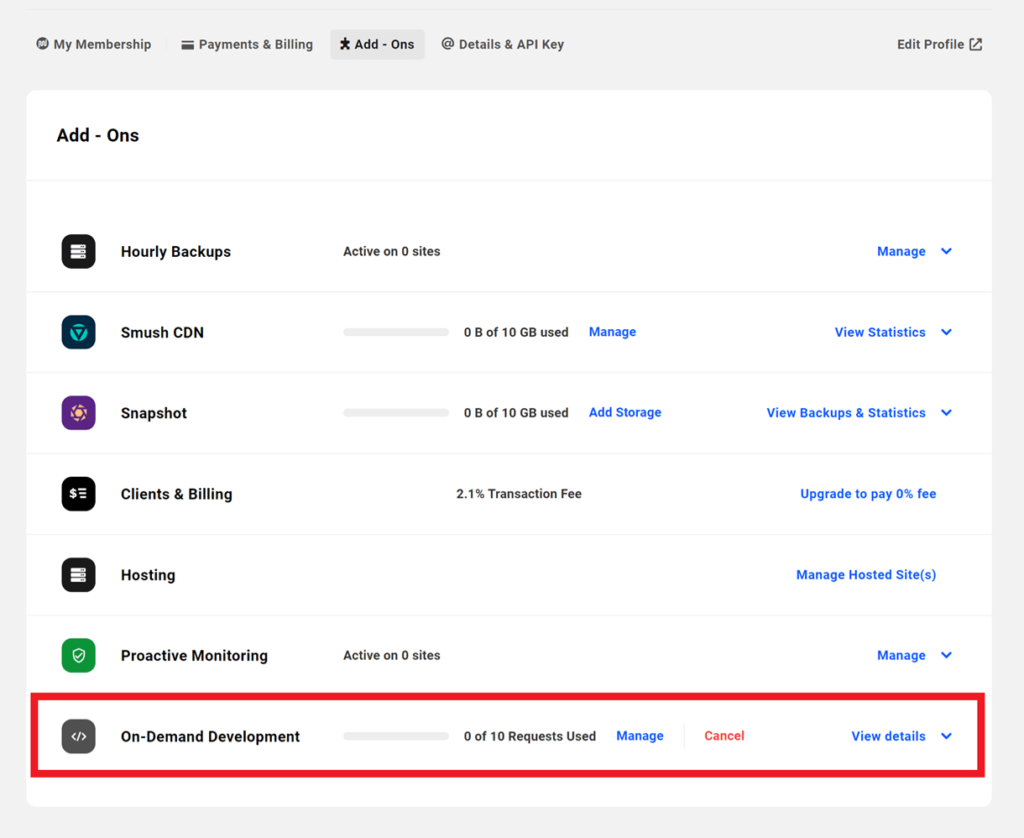
After a successful purchase, you can create new development requests from the Expert Services page in the Hub and manage all the requests from the My Accounts -> Add-Ons page.
Requests do not rollover
Please note that any unused requests from the previous billing cycle will not be carried over to the next month’s billing cycle.
Upgrading plan
When you upgrade your plan, a new billing cycle will begin.
For example, if you have a Starter plan with 3/10 requests left and you decide to upgrade to the Pro plan, you will pay $450 – $250 = $200 with no proration. However, your billing cycle will reset, and you will have 13/20 requests available for the remainder of the current month. From the following month, your total available request count will reset to 20.
To upgrade your existing plan, click Manage in the On-Demand Development row on the add-ons page and select the plan you want to upgrade to.
Downgrading plan
When you downgrade your plan, you will continue to have access to the current plan until the end of the current billing cycle. The plan will be downgraded starting from the next month.
For example, if you are on the Pro plan and have used 13/20 requests, and then decide to downgrade to the Starter plan, you will still have 7 remaining requests for the current billing cycle. From the next billing cycle, the request count will change to 10 requests per month, and the billing will change to $250 per month.
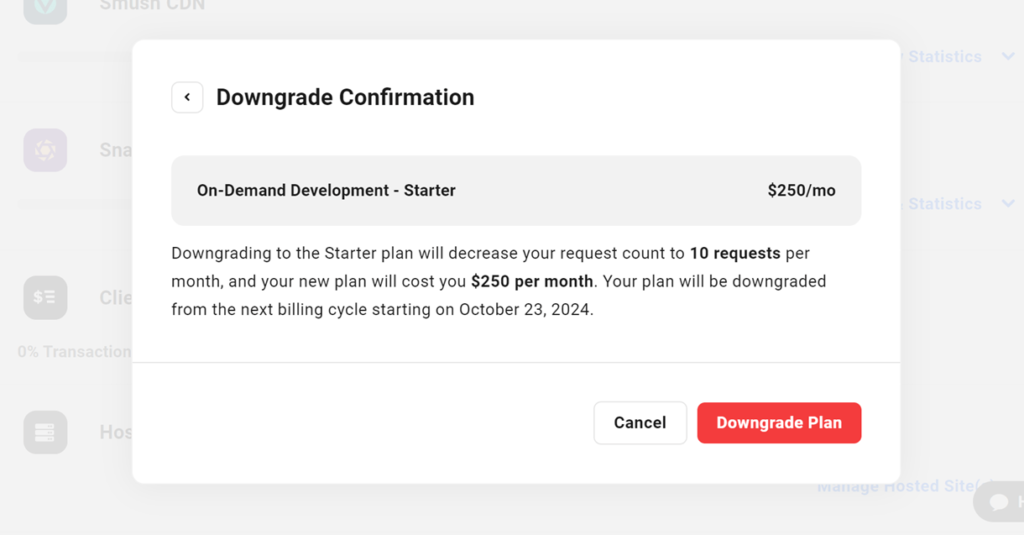
To downgrade your existing plan, click Manage in the On-Demand Development row on the add-ons page and select the plan you want to downgrade to.
Subscription cancellation
When you cancel the on-demand development add-on subscription, the service will be canceled at the end of the current billing cycle. You can continue to use the remaining requests until the end of the current billing cycle.
To cancel the subscription, click Cancel in the On-Demand Development row on the add-ons page.

11.1.1 Custom Development Request
To request custom development, navigate to the Expert Services page in the Hub, select and purchase the plan that best fits your needs, if you haven’t already done so. Then click Create New Request.
In the request ticket, briefly mention what you want help with in the Task Title field, select the website for which you want the custom development help, and in the Popis field, provide a detailed description of the work expected from our developers. Select all the checkboxes and click Next.
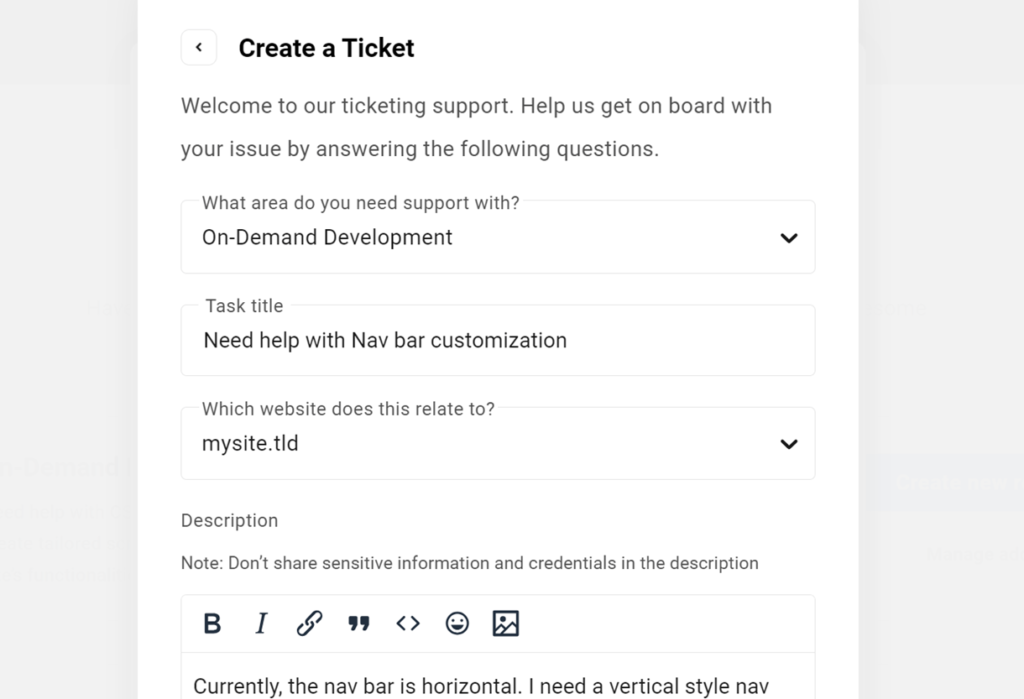
For sites that aren’t hosted with BROUAVO, you need to fill in additional details including the WP-Admin Details and Advanced Site Details.
A new forum ticket will be created for your request. You can view details of your request(s) by expanding the On-Demand Development option on the Add-ons page. Alternatively, you can view all the forum tickets associated with the service by navigating to the Support tab.
11.2 Proactive Monitoring
This monthly subscription plan will ensure that your site is monitored 24 hours a day for downtime by our in-house experts.
If your site goes offline for any reason, our team will immediately get to work to bring it back online. Once the site is back up and running, a support ticket will be created to provide you with an in-depth report and you will be notified of the situation.
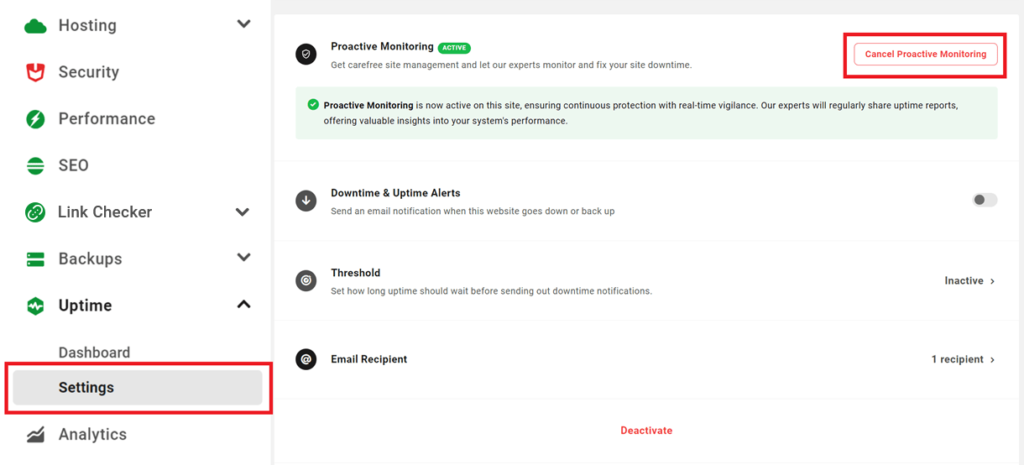
While this service is active, the Uptime Monitor settings in The Hub will be limited: the Threshold & Email Recipient settings won’t be available, and the BROUAVO team will receive all Downtime & Uptime Alerts. Additionally, you will not be able to deactivate Uptime in The Hub.
3rd-Party Hosted Sites
Enabling this service on sites hosted by BROUAVO requires no additional actions from you.
However, sites hosted elsewhere present certain limitations. Our expert team requires access to the site’s server, and would need some additional information at the time of purchase. You would need to:
- Create a new WP admin user on the site.
- Add the new admin user to the BROUAVO Dashboard plugin under Permissions.
- Provide the required WP-Admin Details and Advanced Site Details.
If the site goes offline due to a server issue that cannot be resolved with the WP-Admin or Advanced Site details provided, we will perform all possible preliminary checks, then guide you to contact your hosting provider for further assistance.
Deactivate Proactive Monitoring Service
If you currently have an active subscription to the Proactive Monitoring service and would like to deactivate it, navigate to the Hub and select Uptime -> Settings. Click on Cancel Proactive Monitoring.
If the proactive monitoring service is canceled, the feature will remain active until the end of the billing cycle and will be deactivated once the billing cycle ends.
However, if a site with the Proactive Monitoring add-on active is deleted, both the site and add-on subscriptions will be canceled, and the time remaining until the next billing cycle will be added to your account as credits.
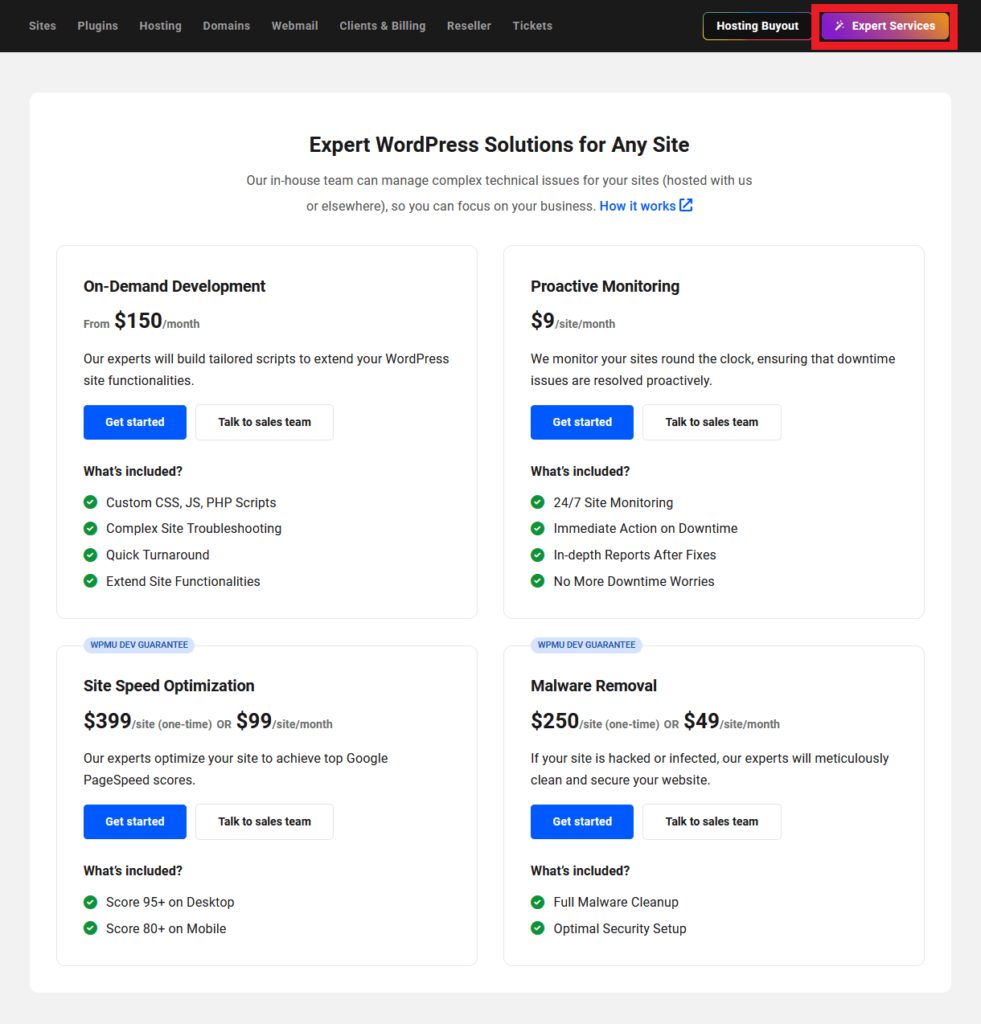
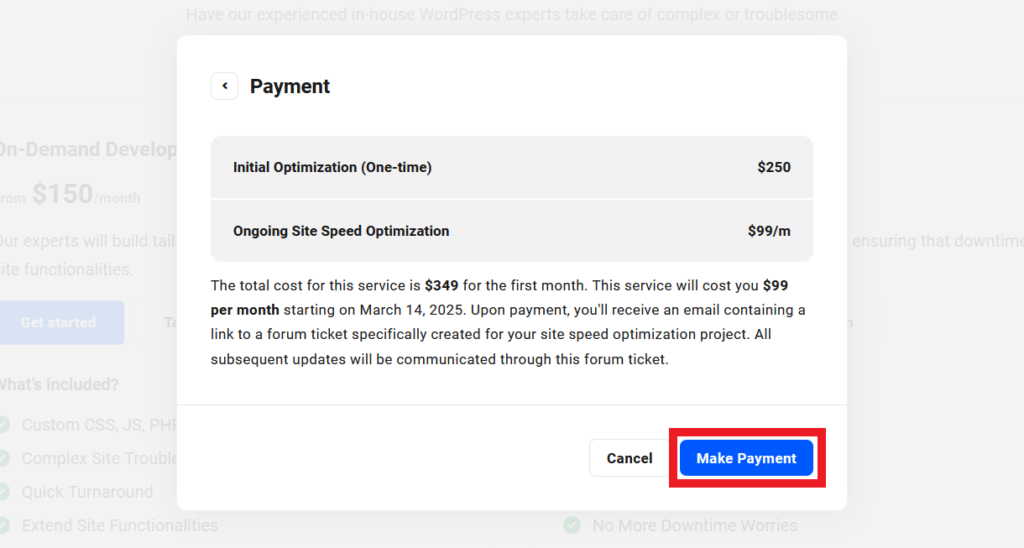
11.3 Site Speed Optimization
This service is offered as a one-time purchase or a monthly subscription plan.
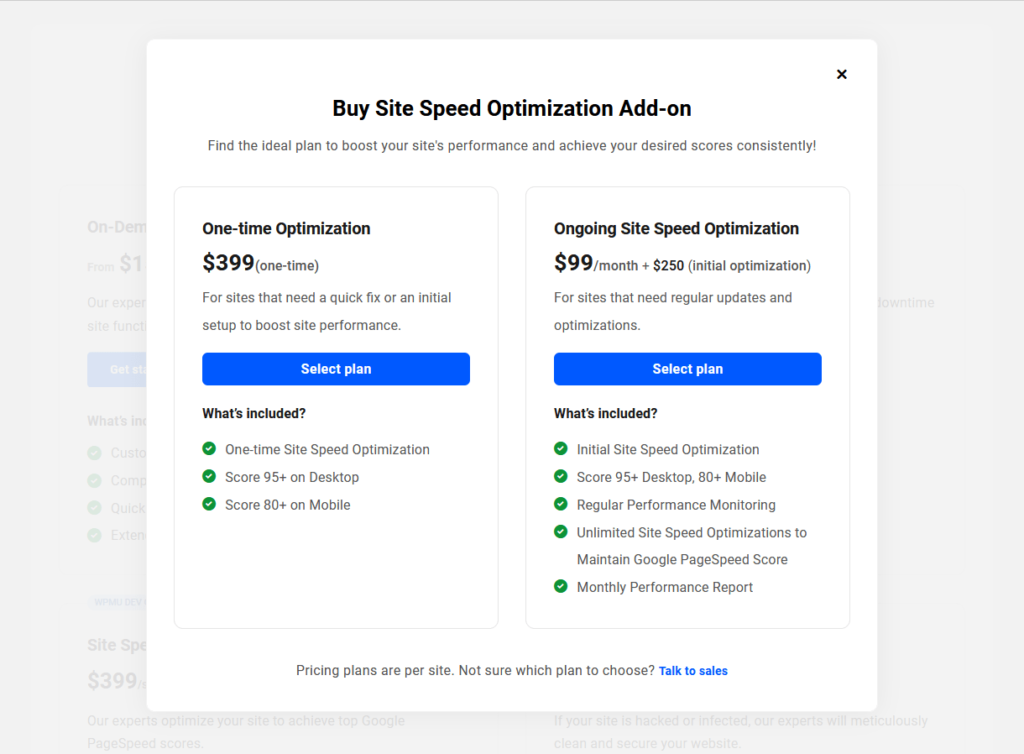
Our experts will ensure your site is optimized to achieve Google PageSpeed scores of at least 95 on desktop and 80 on mobile.
To achieve these scores, it is essential that WordPress core and all plugins & themes be up to date on the site for which you purchase the service, and that you have a full backup of the site and database. You must also ensure that our team is apprised of any known issues or broken functionality on the site before work begins on it.
Turnaround time for this service is generally between 24 and 48 hours, but may take longer for very complex sites.
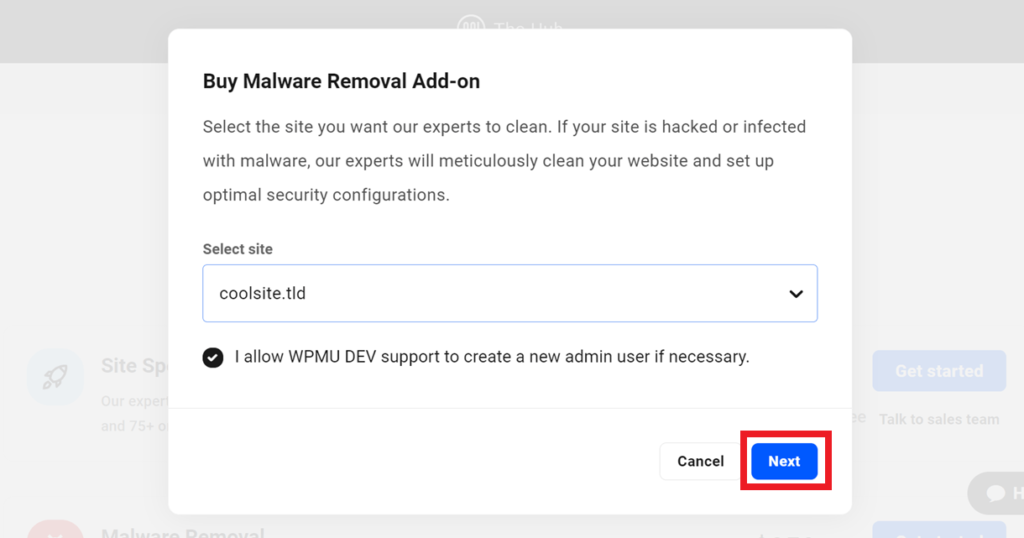
11.4 Malware Removal
This service is offered as a one-time purchase or a monthly subscription plan.
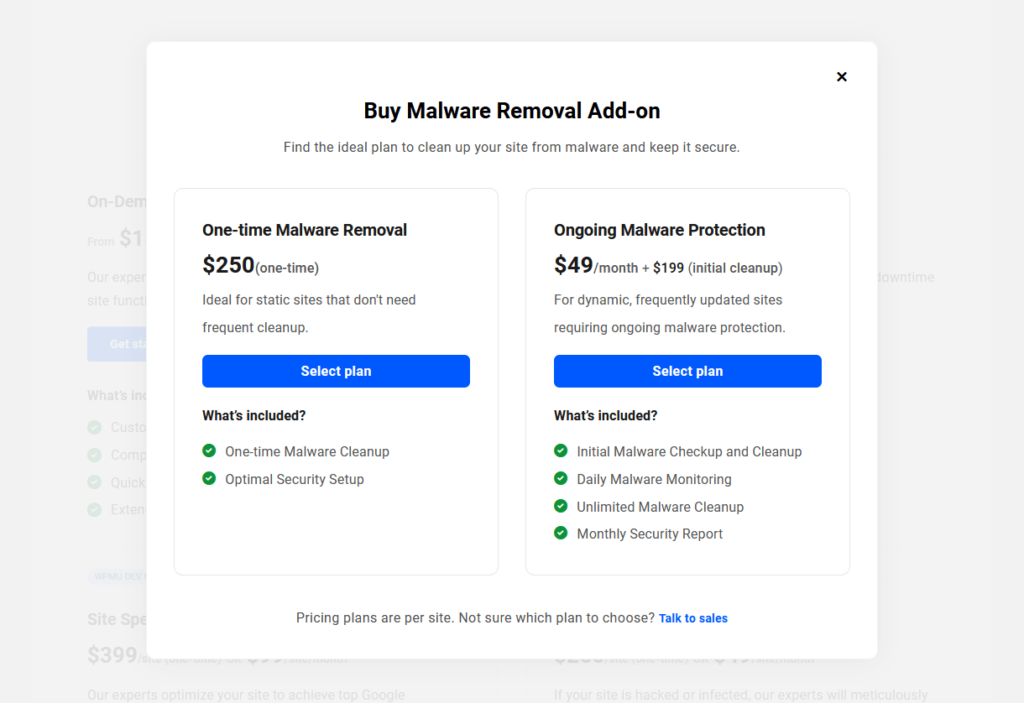
If your site is hacked or infected with malware, our security team will work to clean your site and set up optimal security configurations to ensure security.
11.5 Purchasing a Service
Poznámka
This chapter covers purchasing the Proactive Monitoring, Site Speed Optimization and Malware Removal services only. Purchasing On-Demand Development services is a slightly different process, so please see that chapter above for details on that.
These services are tailored to one website per purchase. If you require these services for multiple sites, you will need to make individual purchases for each site.
Once you purchase a service, a dedicated support forum ticket will be created for your site, and the link to this ticket will be sent to you via email.
All future updates and communication related to the purchased service will be shared in this dedicated private forum ticket. You can engage with our expert members in this ticket.
To purchase a service, navigate to the Expert Services page in your Hub by clicking the Expert Services button in the main menu, then click the Get Started button for the service you want.
In the pop-up window, choose the site for which you require the service from the drop-down menu. A list of all the sites connected to the Hub will be displayed in the drop-down.
Enable the required checkboxes to grant the necessary permissions so our expert members can work on your site and create a new administrator account on your site on your behalf (if needed).
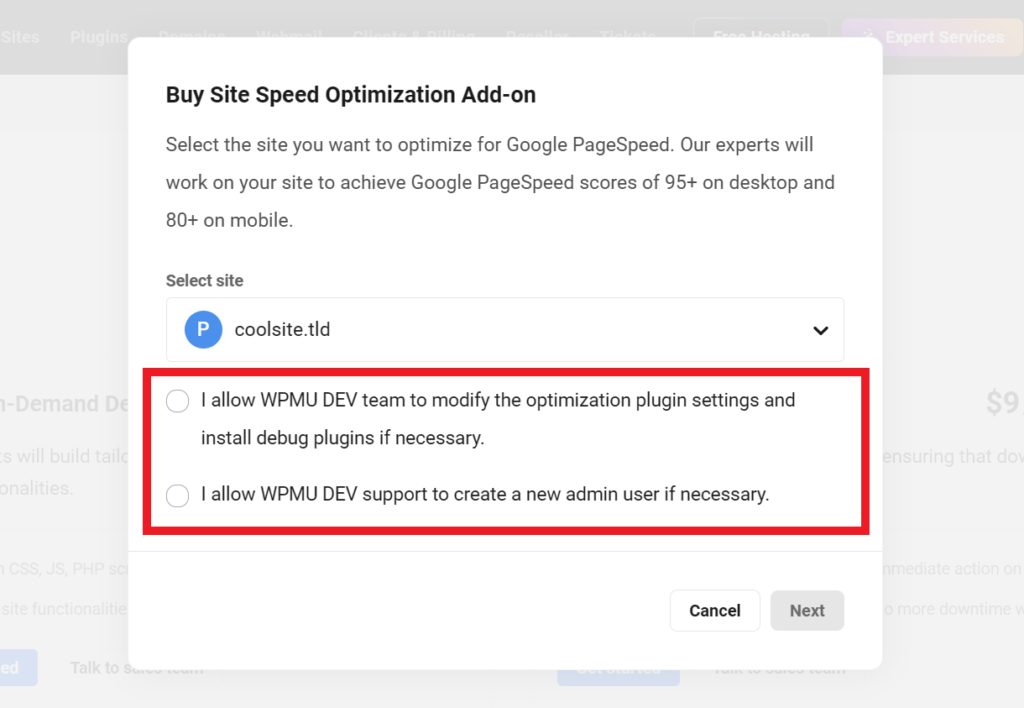
Klikněte na Next.
In the payment modal, click Make Payment to purchase the add-on. If you have any existing account credits, the credits will automatically be used and the amount worth the credits will be deducted from your total payment.
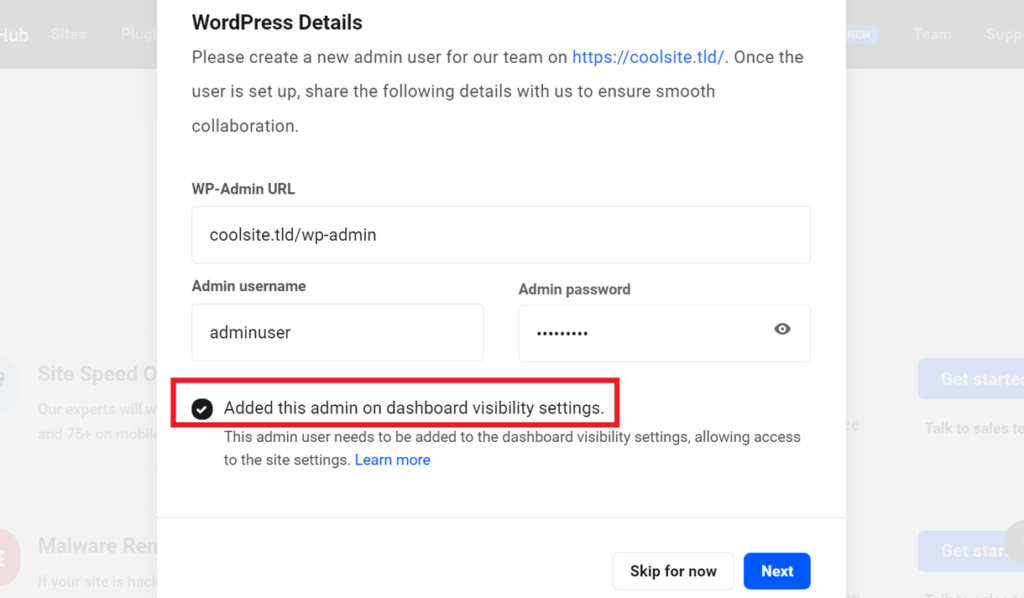
11.5.1 WP-Admin Details
After a successful payment, create a new user with an administrator role on your wordpress site so that the BROUAVO experts can work on your site on your behalf.
Enter the site’s login URL, username, and password of the newly created administrator account in the modal.
To allow the newly created admin role to view and access the BROUAVO Dashboard plugin in the site’s sidebar menu and plugins screen, add the new admin user to the BROUAVO Dashboard plugin under Permissions.
After adding the admin user, enable the Added this admin on dashboard visibility settings checkbox.
Klikněte na Next.
If your site is hosted by BROUAVO, you can skip this step and a purchase note will be displayed with the link to view the support forum ticket created for your service. If needed, you can provide the required login information later in the forum ticket. However, this step is required for 3rd-party hosted sites, so the option to skip it will not be available here.
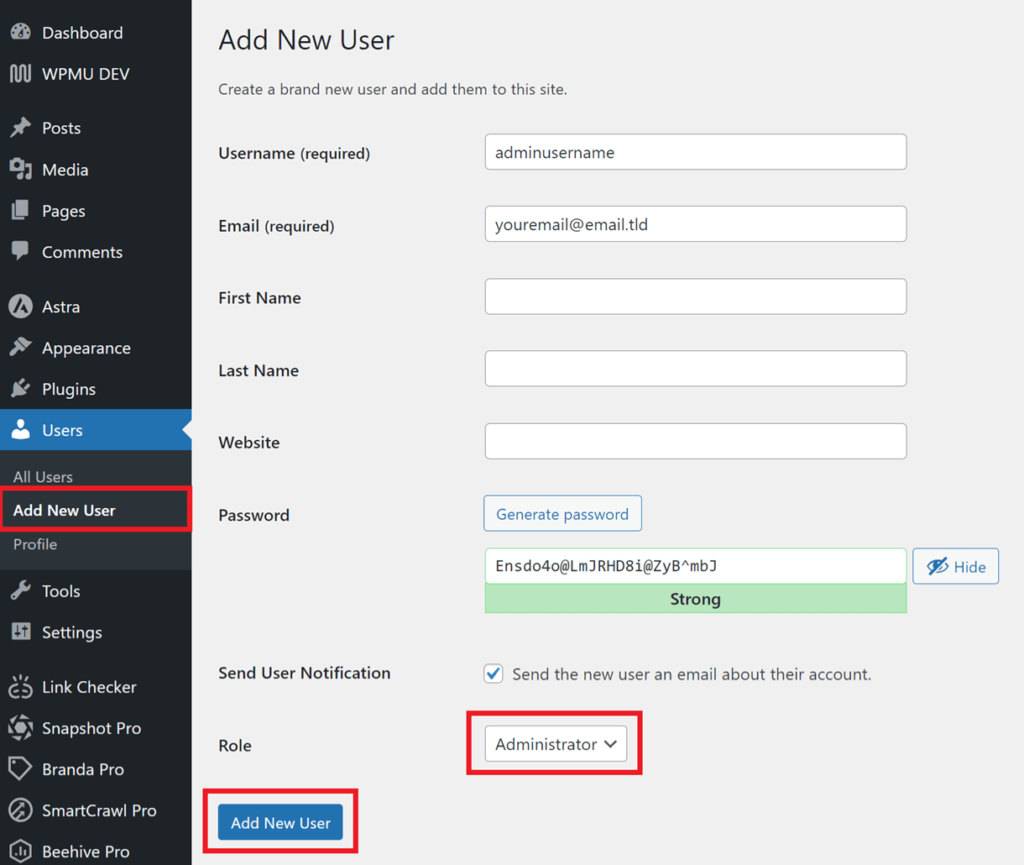
Create a New WP Admin User
To add a new admin user to your WordPress site, navigate to the site’s admin dashboard, and select Users -> Add new user.
Enter a username and an email address that is not already linked to any user on the site in the Email field. Click on Generate Password to create a random password, or input a password of your choice.
From the Role drop-down menu, choose Administrator. Finally, click on Add New User.
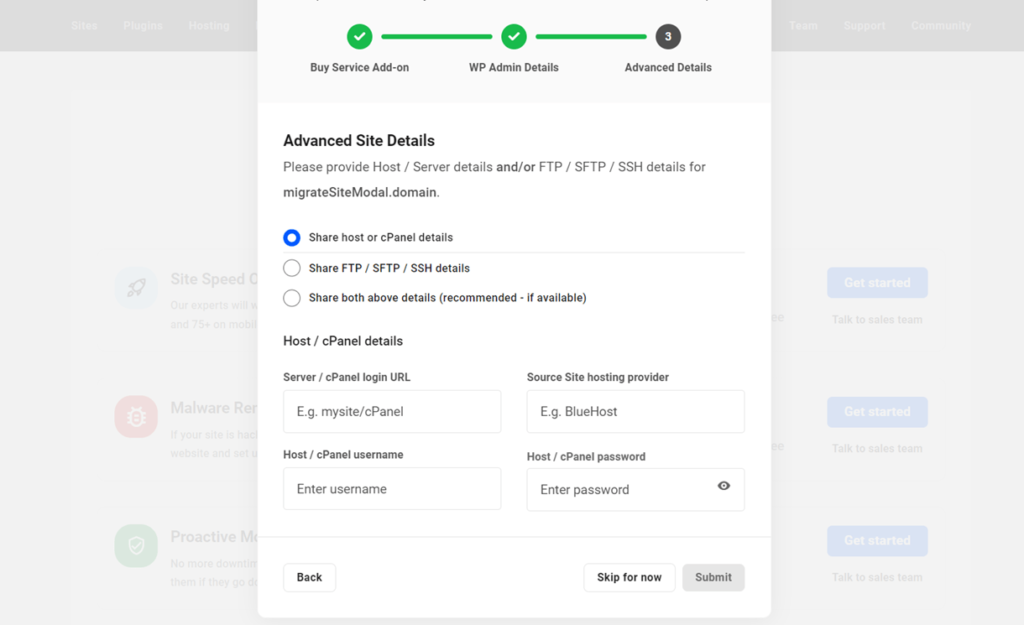
11.5.2 Advanced Site Details
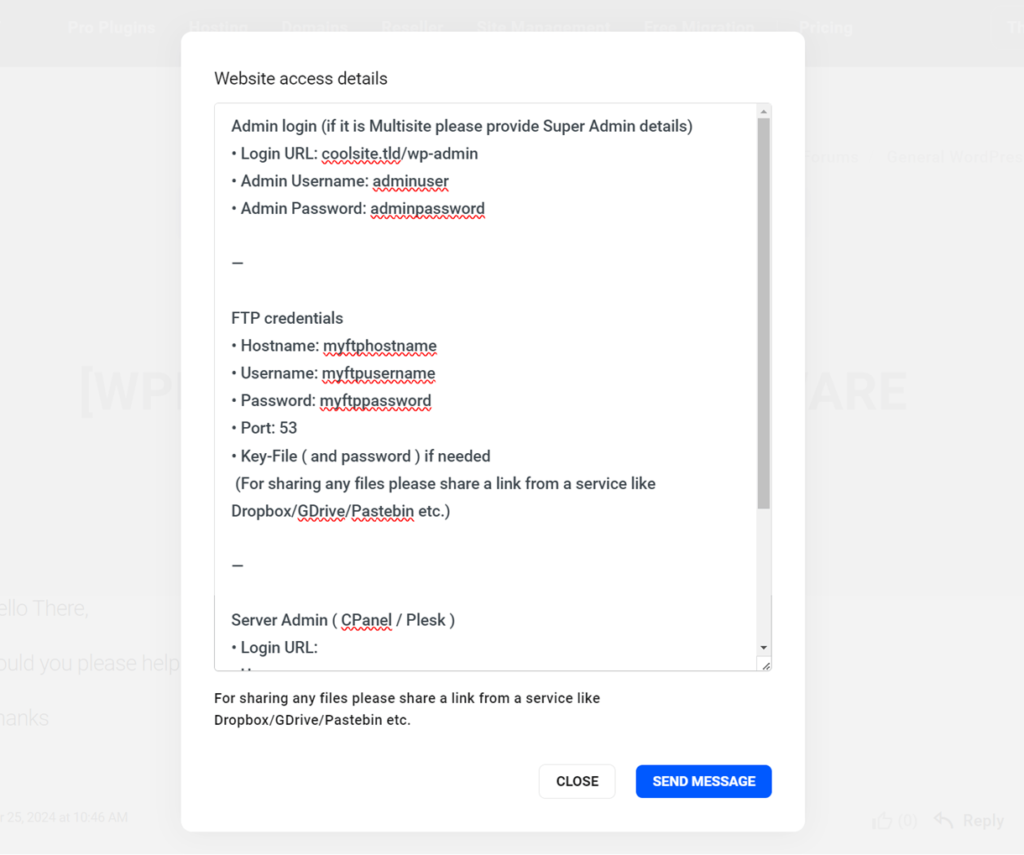
In this screen, you can share either the Host/cPanel or the FTP/SSH/SFTP details of your site or both to make it easier for our support team experts to work on your site.
If you skip this step, you can provide these details later in the forum ticket. After entering the necessary details, click Submit.
After a successful purchase, a thank you note will be displayed and the link to view the forum ticket created for the service. The link to the created ticket will also be sent to the email associated with the Hub.
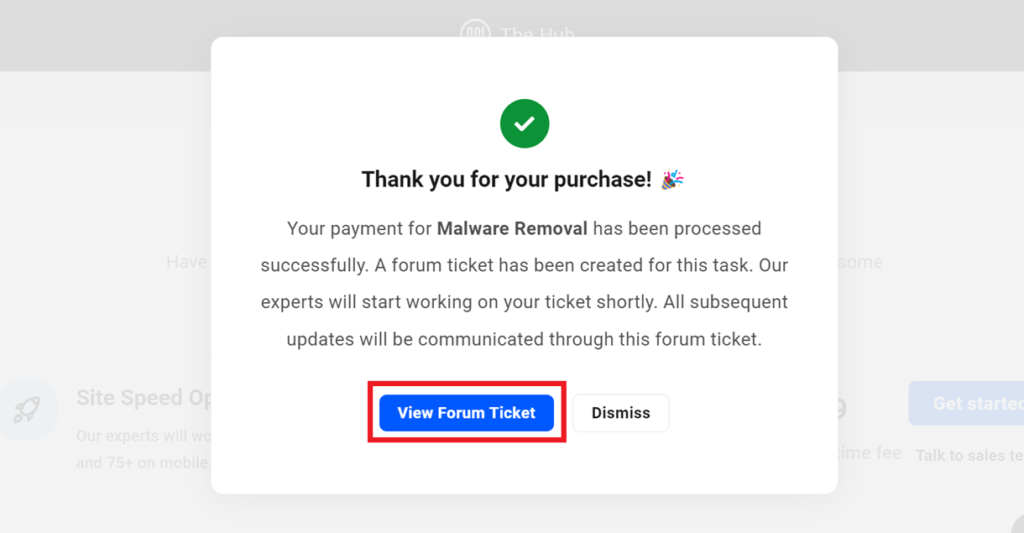
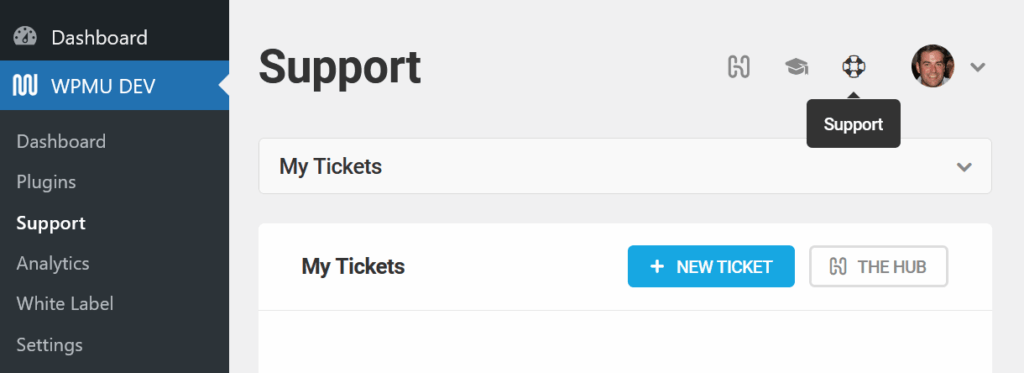
You can also view all the forum tickets associated with your purchased service(s) by navigating to the Support tab.
Provide Additional Site Details
If you skipped providing the WordPress administrator information or additional site information like cPanel/FTP/SFTP/SSH during the add-on purchase, navigate to the Support tab and click the ticket associated with your service.
Click on the Enable FTP Form button. This will make the Direct Contact Form button available.

Click on the button, and in the form that pops up, fill in the required information and submit the form.
11.6 Get Support
If you still have questions or need assistance after reading this document, please don’t hesitate to contact our support superheroes using the available options under the Support tab in your Hub or via the Support tab in your BROUAVO Dashboard.

0 komentáøù